#header-inner { margin: auto; }
Showing posts with label Sewing. Show all posts

Sunday, August 7, 2011

Sewing Lately

A minky blanket for baby Mads...
How did that get in there?
A corduroy and cotton blanket for little baby Lily (can you see her name camouflaged by the flower?)
And a sling for baby Emma.

All three little ones coming very soon! Another baby boom. My machine is smoking.

Monday, March 7, 2011

The Bustle Skirt

So spring-y.

I got the tutorial here. It was a fairly simple project, albeit more time-consuming than I had originally anticipated. I want to make one for me, but that is a lot of cutting. My hand gets tired easily. And there is no one around during the day who will listen to my whining about a cramped hand.

She wore it to church yesterday. I got asked a few times, Did you make her skirt? Hmm...the more I thought about it, the more I thought...it must just look really homemade. But that is ok. I love it. And I will have her wear it again.

If you make it, cut out more circles than you think you will need. Pack them in tightly. I used an old T-shirt for my base skirt. I think I would use a lighter-weight material next time, but you can't foresee all of the problems the first time around. I just love it when a project comes together. For the most part.

Happy, oh happy Monday. Off to clean the house.

Saturday, February 12, 2011

More Slings?!

I don't love doing very "boy-y" (yes, that is a word. Look it up) slings. I feel just fine sewing with flowery, pink and purple fabric, but I don't like to sew with cars or dinosaurs or pirates (or, God forbid, skulls- I know, Kara, I know).

Anyway, what the heck do I know? The consumer wants all of those things. Baby Sightings called back, wanting me to make some unabashedly tiny male slings. I obliged. I will take any excuse to visit the Wonderful World of Strawberry Patches. (Psst- they are expanding. Are you as excited as I am?!)

So here they are. I did get a photo lesson from Meg, but that was after I took this picture.

I am not too far away from picking up some skull and crossbones fabric. Oh, what a world! What a world.

Sunday, January 23, 2011

New For Baby Sightings

Baby Sightings called and wanted a new set of slings.
So I got to borrow a machine from a dear friend.

And sew for two whole hours, relatively uninterrupted. Hooray for daddies and the Australian open.
I have to give the machine back this week, but that little hit of sewing sure felt good. :)

Monday, January 10, 2011

Monday, Gloomy Monday...

Boo

Hoo.

It is a sad day when I cannot sew. If I have to take a week off, or- heaven help me-months (!)...I can't even think about it.

Ol' Brother had been acting up during the Christmas season. I knew what the problem was- this little metal thingy (that is what the manual calls it) had been getting weak and therefore my bobbin thread was unregulated. It kept getting bunched up while I would try to sew. I was able to wriggle it back into position many times. I was so very proud of myself, fixing my own machine like that. However, for anyone who has ever wriggled a soda can tab back and forth...back and forth...back and forth...you know the inevitable outcome.

Snap.

It died. That little metal piece just laid down and gave its life for the good of the machine. So the parts of the machine that don't want to work as hard can now have a little respite. It was so very socialist of my Brother. I hate socialism. And I am mad at my Brother. For my sweet husband has told me that I will not be able to get my machine fixed until April.

Not three days before the incident, we had been discussing my dire need to stick carefully to the budget for the coming months.

No outside spending
, he said.

Aye
, said I.

And then this. The Lord is testing my submission.

Of course, I called the manufacturer. I can work a power drill. I can program a garage door. I can refinish furniture. Surely I can uninstall and reinstall a teeny tiny metal part into an expensive machine.

But they were on to me. They referred me to an Authorized Service Dealer. Apparently many people such as myself want to save the $75.00 and just Fix It Themselves. And get mad at Brother when the process doesn't go quite as expected. Have they been monitoring my phone calls or something?

So I shall wait. And make bows. Or crochet. Or bake. Or something. It just doesn't seem like creating if there is not a whirring machine and crisp, expensive new fabric involved.

Boo Hoo.

Monday, July 19, 2010

Foiled Again...

Oh, the frustration of a failed project! I'm working on craft time fumes here, Mr. Jack and Jill Hat! You are a lovely pattern, and I had such success with your "Jack". But your "Jill" is a different story.

I measured Rebecca's head.

I cut my pattern.

I made a hat.

It was too small.

I took Suzanne's sage advice and called on the girls at the shop for help.

I followed the advice and made another hat.

Grrr. Too small again. I realized I had measured wrong...again...( I am even sleeping well, for heaven's sake!)...and so I bestowed the hat on dear friends for their almost-here-baby-girl. Their gratefulness made all of my frustration leave instantly. Now I just feel warm and fuzzy. I can't wait to meet you, little Paige!

Here is the top of Rebecca's head modeling the hat for you :)

Tuesday, July 13, 2010

Tutorial: Baby Girl's Shabby Chic Ruffle-Booty Onesie

This project is so easy. If I know you, then you probably have a daughter or a friend's daughter you can whip these up for.

It takes less than 30 minutes to make 4 onesies. What a great shower gift! You can use fabric scraps, too! If you have the mega-packs of white onesies lying around your home, you can make these babies for free. If not, check Walmart or Target. I think I have even got some from a $2.00 bin at Walgreens.

Materials:

Fabric Scraps, cut into (3) 1.5 x 15 inch strips. Coordinating fabrics look best
White or Colored Onesies
Matching Thread
Lots of Pins

1. Cut your scraps into strips. I like to tear mine for a shabby chic look. Just make a small (1/4 inch) snip 1.5 inches into your fabric piece and tear. This part is quite satisfying. R-r-r-r-ip your worries away! You will need three strips for each onesie.

2. Ruffle your strips. Here are three ways to ruffle:
a- use a ruffler foot
b- stitch two rows of long, straight stitches in the middle of your fabric, then gently tug one of the ends to gather the fabric uniformly
c- set your tension to "9" and choose your longest stitch (mine is 5.0). The combination of
these two things automatically ruffles the fabric on most machines. My girlfriend Krista's machine won't work this magic for her. My machine does it every time. Trial and error.

3. Make sure your strip is gathered in the middle of the fabric. Look at the picture below. The stitching runs down the dead center of the strip (.75 inches down a 1.5 inch strip). This way, each side is evenly ruff-ly.

4. Decide where you would like the strips to be situated on the booty of your onesie. We began our strips right above the leg opening. Tuck each end (right and left ends, not top and bottoms) under itself and pin. Then use a generous amount of pins all the way down the ruffle, taking care to make the ruffle as straight as possible across the onesie. (Do a better job than it looks like we did on this picture.)

5. Take the second ruffle in pin in the same fashion. We overlapped the top edge of the second ruffle with the bottom edge of the first ruffle.

6. Repeat with the third ruffle.
7. Make sure you reset your machine to sew a normal, straight stitch. Adjust your tension and your length. Now sew the ruffles to the onesie, taking care not to sew the pins. Remove as you come to them. The ruffles tend to hide pins, and you wouldn't want a sweet baby girl getting stuck with your wayward pin. Also take care not to catch the front of the onesie while you sew the back. This material is very stretchy, so you can manipulate while you sew the back. It will snap back to its original shape.
8. Indulge me and do another once-over to find that pin you couldn't see the first time. Then clip away any rogue threads. We liked to leave a little fray and thread on the fabric to capture the "shabby-chic" look we liked. As the new mommy washes the onesies, they will fray a little more. Perfectly shabby.
Thanks for reading! And thanks to Summer, who let me do this project with her. We had so much fun!


make it wear it

Saturday, July 3, 2010

The Jack and Jill Hat


I've been wanting to make this hat ever since Suzanne started offering the pattern in her store and Amanda made a few adorable examples. My first attempt was with a boy's hat, and while it looks good on the outside, the inside lining is nothing that I am proud of. I can't wait to try again with a little girl's hat. I get a little addled by patterns. I learn much better by watching someone else. That is why I love blog patterns and tutorials. Clear, colored pictures make it easier for me to learn.

He wore it all day yesterday, which made his mama quite happy. And then we took off to Pasadena for an extended-family Fourth of July celebration.
Here is the Sienna T-Shirt Dress I got to make for a friend's daughter, turning ONE today. Happy birthday, Maddy! The shirt is one of Maddy's mommy's old T's, covertly given to me by Maddy's grandmother.

Friday, June 11, 2010

Peeks of WIP

Works in Progress.... a blanket for a friend who is officially adopting!


Pillow #1 out of 8 for my sister-in-law
Leftover scraps put to good use!

When I sew, I love to listen to Everything But the Girl's Walking Wounded. What do you like to put on while you craft?

Have a blessed, relaxing weekend.

Friday, June 4, 2010

Here comes the bride!


The kids are in a wedding this weekend! We are so excited. I got to embellish this basket and make a ring bearer pillow. Then I found a flower girl dress on Etsy for Rebecca as well as a cute hodgepodge of formalwear for Jackson. I ordered a blue shirt online and it came with a tie. I was thrilled that the set was only $6.99. But then I tried it on him...disaster! The tie came to the top of his belly button. The shirt is a little tight, even though it said "5/6", but I can make the shirt work. The tie, not so much.

So I went to my beloved treasure trove of crafty web resources and found this tutorial. Then I scavenged around Beau's closet for a color-theme-appropriate tie and went to work.

The big tie is what I started with.
The little tie is what I ended up with. It took about 30 minutes (probably would have taken less time, but since it was for a wedding, I wanted it to be as close to perfect as possible!)
I extracted the little clip from the too-short tie and and worked it onto the new tie. I tried on his whole outfit: shirt, tie, suspenders, and pants- adorable! My prayer for the children is that they would follow instructions and not be a distraction of any kind. Update on Monday.
Have a blessed weekend!

Thursday, April 8, 2010

Upcycle Tutorial: Turning a Sweater into a Baby Bear Beanie

Somebody please stop me.

This is too much fun.

I keep finding items "to donate" around the house. I am depriving a Goodwill somewhere of some really nice clothing.

This is a great project for those of you whose sewing skills fall somewhere around the "I know where the on switch is" set. Please don't be insulted. This is a very easy project that you can finish in about 20 minutes. What a fun gift idea! Make two or three and tie them up with ribbon to give to a new mommy.

Okay. Let's turn your husband's soft old sweater into a super-cute little bear beanie.

Note: When working with knits, spray each piece with starch and iron flat before beginning your project. It will go much easier. Trust me.

1. Roughly measure your little one's head. My baby is 10 weeks old and his head circumference is about 11 inches. So each of my hat pieces were 5.5 inches wide.

2. Use the stretchy trim at the bottom of the sweater as the bottom of your beanie. Cut out an elongated arc shape. You will have two hat pieces. Make sure you cut these two pieces two or so inches longer than a normal beanie as you will be rolling up the bottom of the beanie.

3. With the sweater still lying flat, cut two sets of ear pieces. Again, make these a bit longer than they appear to be on the hat. You will be sewing them inside the beanie.
4. Sew the ears. Pin each set of ear pieces, wrong sides facing out. Sew the arc, leaving the straight bottom seam open so you can turn it right side out. Use a 1/4 inch seam allowance.
5. Pin the wrong sides of the beanie together. Arrange the ears in your desired position and pin. See where I have mine? Note that you pin the ears with the raw edges of both the ears and the beanie together.

6. Now you will sew your beanie together. Make sure you catch the ears when you sew. IMPORTANT: Start sewing at the top of the stretchy trim. Leave the entire length of trim open. We will sew it later. Sew around just the sweater portion of the arc. 7. Turn your beanie right side out. The bottom sides should be open.

8. Now we will sew them together. Sew your outside seams right where your inside seams ended. These seams are so that, when the hem is rolled up, you will not be able to see any protruding seams.
9. Now flip the bottom up. You have a rolled hem little bear beanie. So cute! Great job.
10. Go find a cute, chubby, not-impressed baby to try your hat out on. Then email me a picture! And whip up some pants from the sweater sleeves to match! I will try to post that tutorial soon.

Friday, March 26, 2010

Upcycle Tutorial: Turning Your Husband's Undershirts into a Super-Soft Nightgown

Beau was going to throw five of these away:
They were too soft to discard and too intact to give to Goodwill, so I decided to make a simple nightgown, soft and sweet for springtime.

Your nightgown will take about an hour and a half to make, almost as long as blogging about it.

Take 5-6 of your husband's old undershirts (or T-shirts..get creative!)
Use white thread.

Get out your spray starch. This is the secret to working with knits. Spray all of your pieces before you iron and sew them. They will be much, much easier to work with.


On with it-
1. Smooth out the first shirt and cut off the midsection, right under the arm holes.
2. Take the bottom piece and fold in half. Reserve for later. This will be your bodice.
3. Cut out shoulder straps from the top piece. The long rectangular middle pieces will be the straps. Discard the other three pieces.
4. Cut off the bottom 3/4 of the rest of your shirts, just like you did for the first piece.
5. Now cut along the bottom fold of the tubular pieces, opening each piece up into a long rectangle.
6. Open each piece up. With different shirts, you will have varying lengths. This is okay. Knits are tricky and you will compensate later.
7. Use a french seam to sew your rectangular pieces together. Sew each piece together, lengthwise, right sides together, with a 1/4 inch seam (approximately: again, knits are tricky). Now flip your fabric, wrong sides together, press, and sew another seam, enveloping your first seam. Press and topstitch.
8. Here is the french seam, nice and tidy. Go here if you need more detailed instructions on making a french seam.
9. Sew your skirt closed by using a french seam to attach the last piece to the first piece.
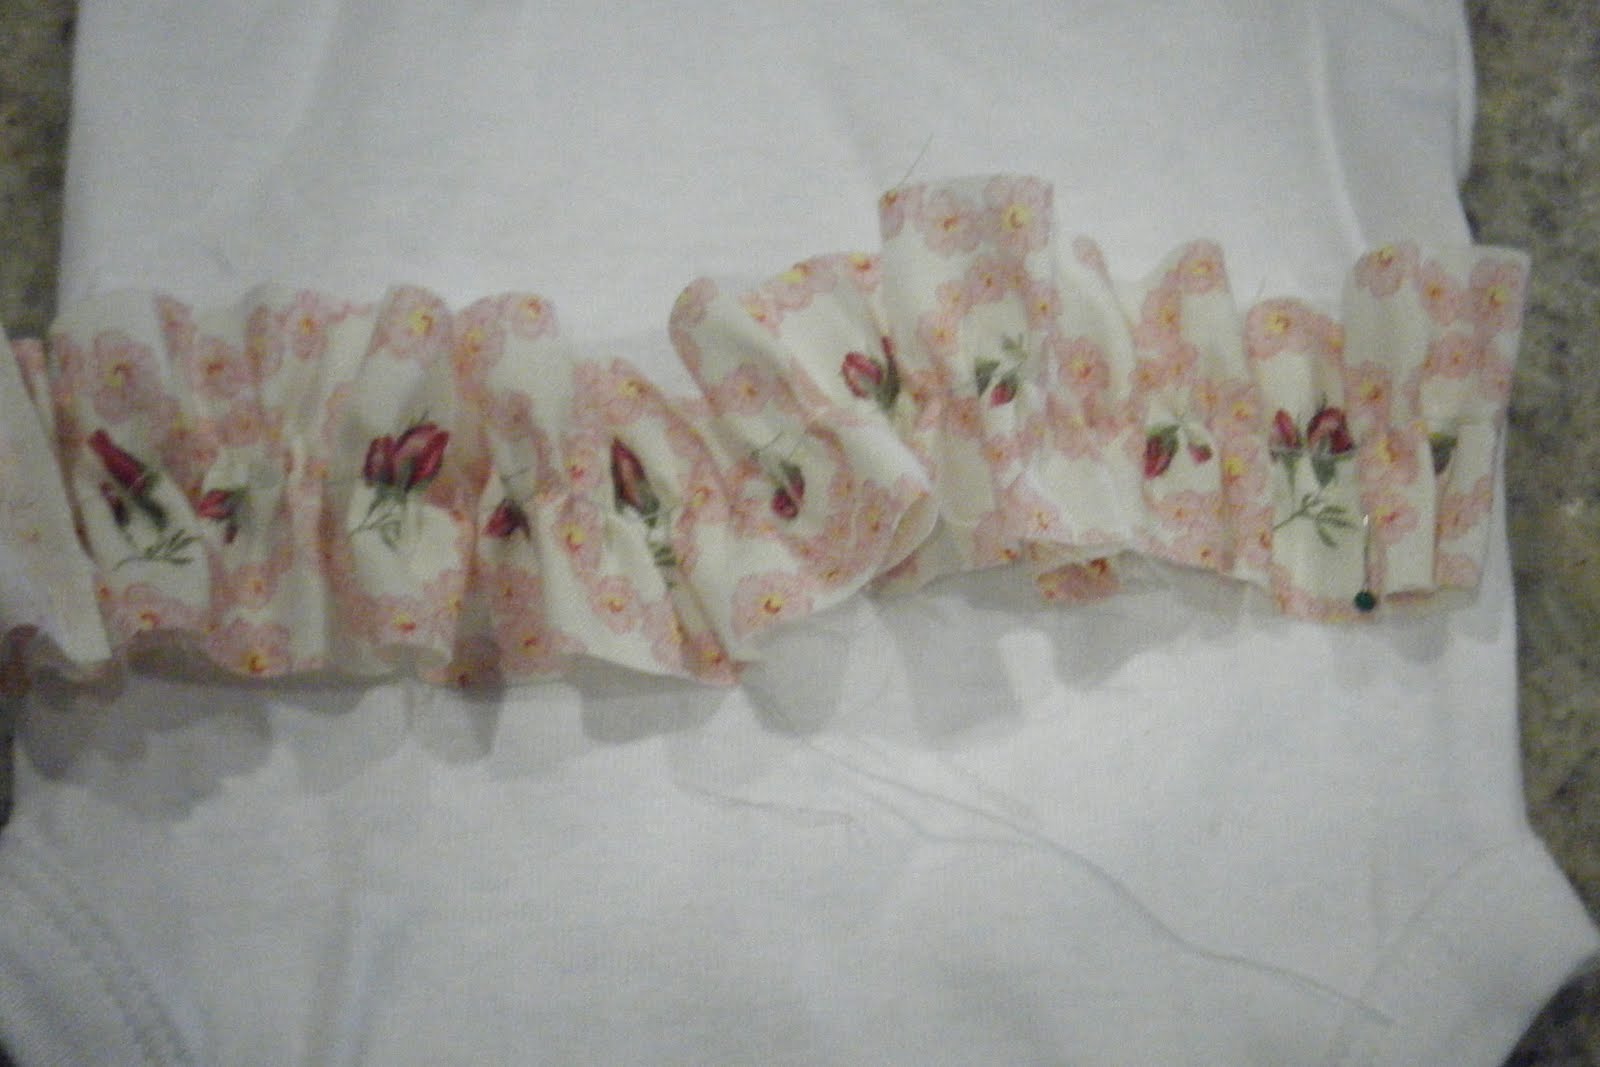
10. Lay it flat and trim one end so that your top is even. We will be gathering the top part of the skirt before attaching it to the bodice.
11. Gather your skirt piece to a circumference that fits comfortably under your chest. Measure with a measuring tape right under your bra line and gather the skirt accordingly.
11. Take your reserved bodice piece and fold it in half so that the raw edges come together. Slide it up over your chest and fit it to your body. Pin and sew it so that it is quite snug in circumference. This is knit material, and it will stretch considerable as you wear it. Err on the side of too tight.

12. Now sew the tube shut. Place the raw edges together and sew along the bottom. This gives you a lined bodice.

13. Turn your bodice inside-out and fit it over the top of your skirt. The right side of the skirt fabric will be pinned to the wrong side of the bodice fabric. If you can't picture it, pin the two together, then flip the bodice up. It should look similar to your finished product.
Here is a closer view of the pins.
14. Sew the bodice to the skirt. It helps to have a denim-strength needle as you will be sewing through layers of gathered material. Flip the bodice right-side out, press, and topstitch.
15. Retrieve your strap pieces and iron them according to your desired width.
16. Sew them shut.
17. Now for a fitting! Try your nightgown on and figure out where you would like your straps. Carefully by yourself, or with the help of a trusted friend, pin your straps to the front and the back of your bodice. Take your nightgown off. Sew the straps to the bodice.
18. Try the gown on again and decide your desired length. I kept mine quite long as I am 5' 11". If you want it short, cut it accordingly. Hem the bottom of the gown.

And here is the finished product! It should hold up quite well to many washings, it is lightweight and drape-y, and your husband will probably be quite impressed that you love him so much that you would wear his old shirts...so attractively!

P.S. My gown does not fit my size-2 model like it fits me. The bustline should hit right under your chest. Happy sewing! Please feel free to contact me with any questions or any suggestions on making this tutorial better.

LinkWithin

Related Posts with Thumbnails